A lot of users have started shifting to Windows 10, ever since Microsoft ended the support for Windows 7. Windows 10 is a major upgrade when compared with the previous Windows releases and it brings in a lot of amazing features. Hence, in this guide, we’ve compiled the best Tips, Tricks, and Hidden features for Windows 10. Without waiting further, let’s get started.
1) Customize the Start Menu on Windows 10
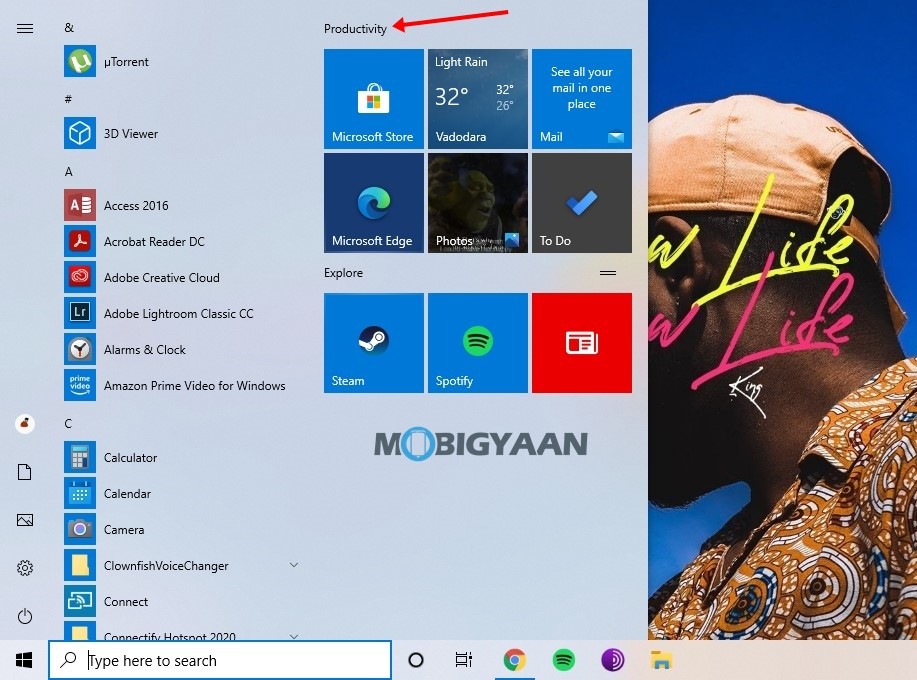
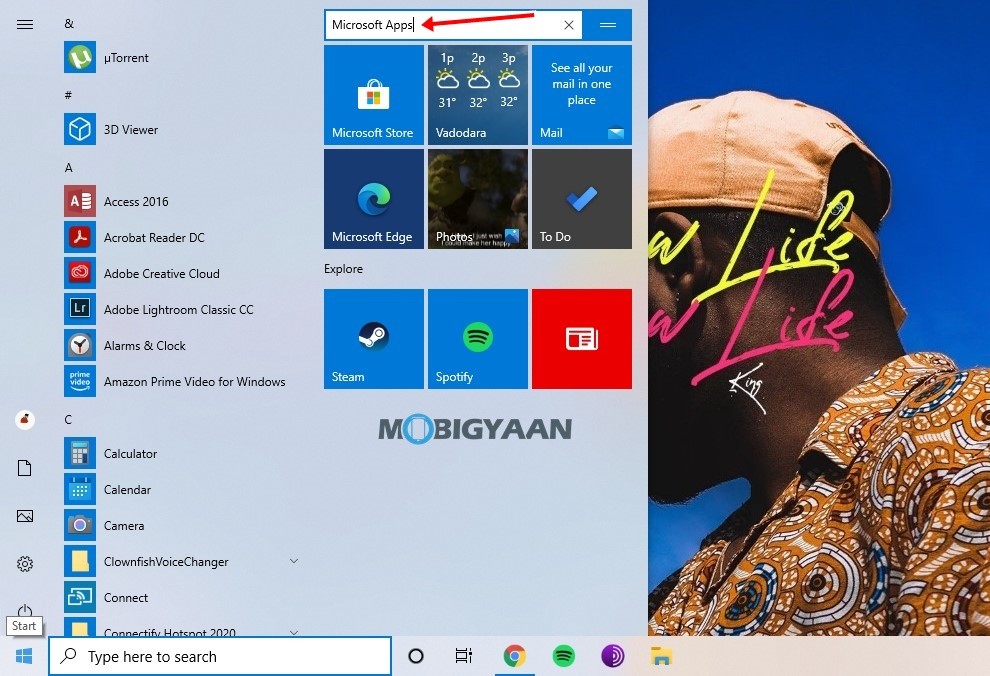
Windows 10 comes with an all-new start menu that supports live tiles and allows users to group their Apps by different categories. By default, there are a lot of Apps present in the live tiles section but users can replace them with the Apps they use daily so they can access them quickly. Have a look at the steps below to see how you can customize the Start Menu on Windows 10.
i) Rename Sections in Start Menu
Step 1: Bring up the Start Menu on your Windows 10 PC.
Step 2: Left-click on the Section name and type in the new name which you want to use. Once you are done, just click on a blank space and your new section name will be applied.
ii) Resize your Live Tiles.
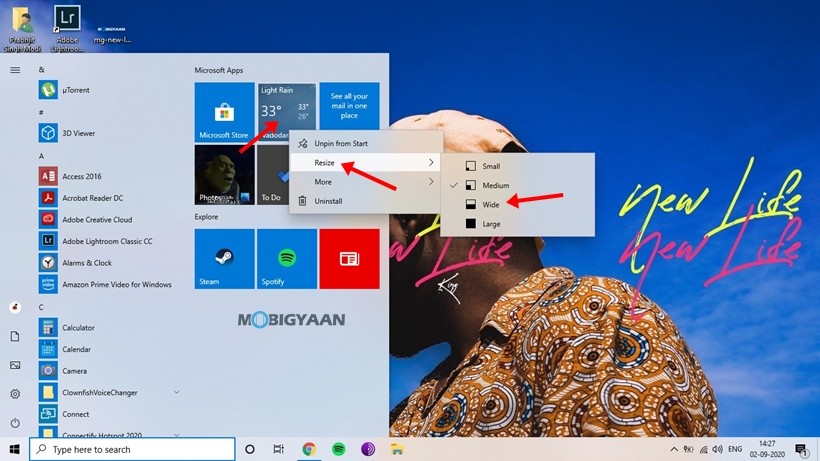
Step 1: Bring up the start menu on your Windows 10 PC.
Step 2: Right-click on your Live Tiles and head to the Resize section.
Step 3: Choose between the 4 resize options and click on your preferred size to resize your live tile.
Have a look at the images below to see how it’s done.

2) Use Dark Mode on Windows 10
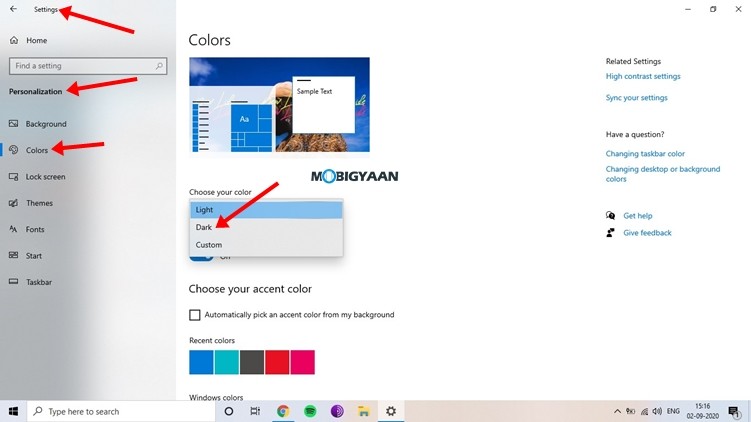
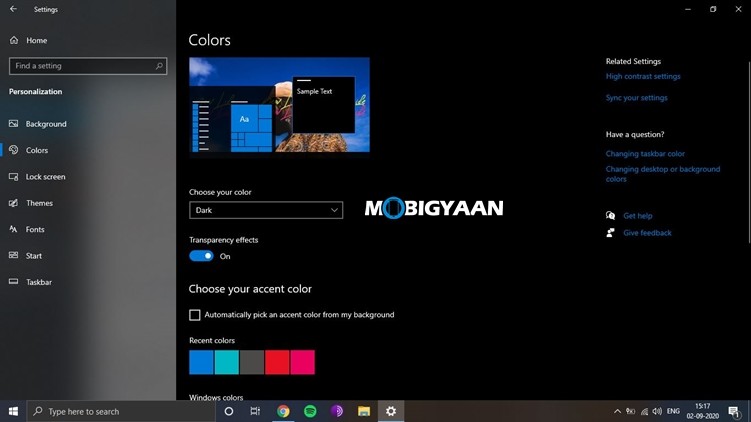
With the introduction of Windows 10, users got their hands on the dark mode and they have been loving the theme and the overall user experience they get after switching to Dark Mode. The dark mode helps you to reduce eye strain and in addition to this, it also helps to save the battery life on your laptops. To enable Dark Mode in Windows 10 all you have to do is:
Step 1: Go to Settings -> Personalisation -> Colors.
Step 2: From the “Choose your color” section select “Dark” to turn on Dark Mode on your Windows 10 system.
3) Get Rid of the Start Menu Ads
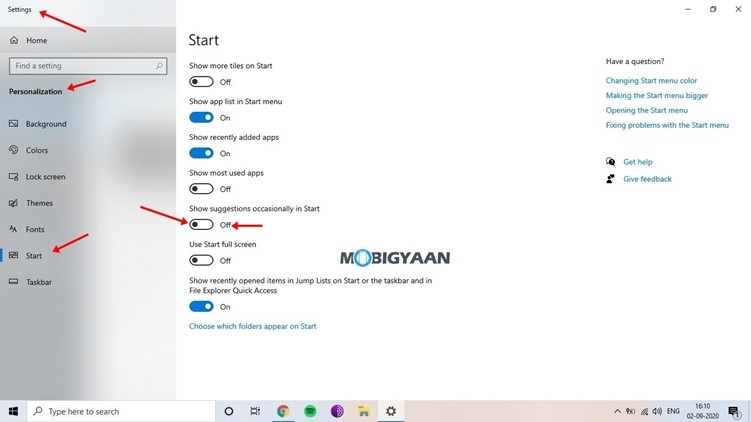
Windows 10 sometimes shows you App Suggestions from Microsoft Store on your Start Menu and most people using Windows 10 find that annoying. However, you can disable those ads with a few easy steps. Have a look at the steps below to see how it’s done.
Step 1: Go to Settings -> Personalisation -> Start.
Step 2: Turn off the “Show suggestions occasionally in Start” button.
4) Turn on Windows Startup Sound
For some reason, Windows 10 doesn’t play any music by default when it’s starting up. However, if you are someone like me, and you are missing the good old Startup sound then this trick is for you. Have a look at the steps below to see how it’s done.
Step 1: Go to Settings -> System -> and navigate to the “Sound” tab.

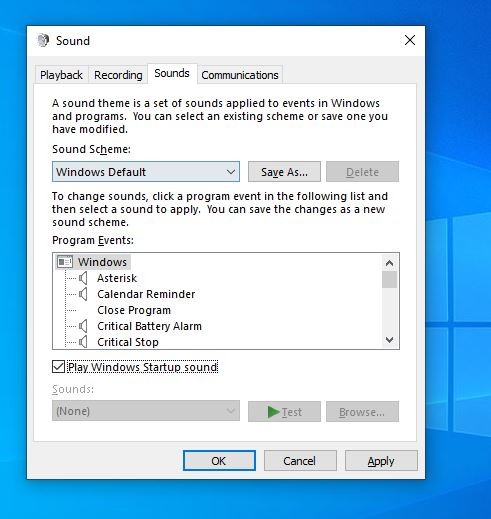
Step 2: Bring up the Sound Control Panel from the Related Settings Menu. Once the sound panel is launched, click on the “Sounds” tab.
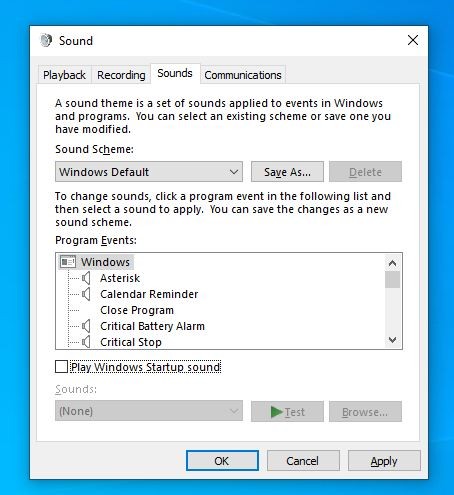
Step 3: Enable the “Play Windows Startup sound” and you are ready to go. Windows will play startup sounds the next time you restart your PC.
5) Make use of Cortana
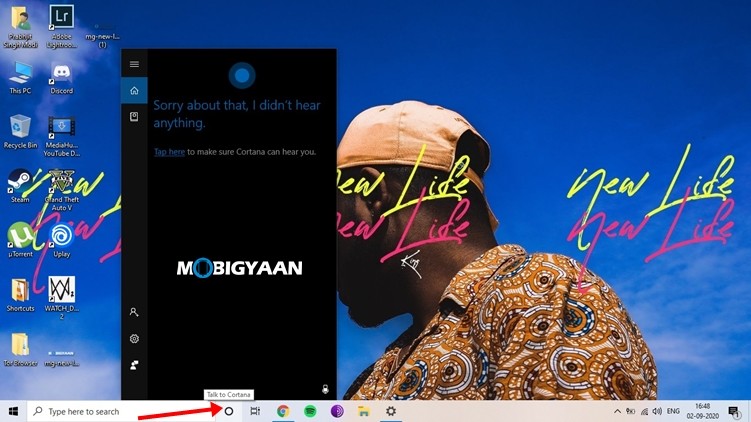
We all use Voice Assistants in our Smartphones to get things done easily. Whether it’s Google Assistant or Siri every voice assistant comes with its own commands and special features. The same is with Cortana on Windows 10. It comes with its own unique features and you can use it to search for things in your PC or Web. To use Cortana on your Windows 10 system just say “Hey Cortana” or just bring it up by pressing on its logo from the taskbar. You should have a working Microphone in order to get tasks done from Cortana.
6) Disable your Startup Apps
If you are someone who has a lot of applications installed in your Windows 10 system then you might have noticed that a lot of Apps automatically start as soon as you start your system. These startup apps have a high impact on your boot time and if you don’t use them you can disable them from the Task Manager. Have a look at the steps below to see how it’s done.
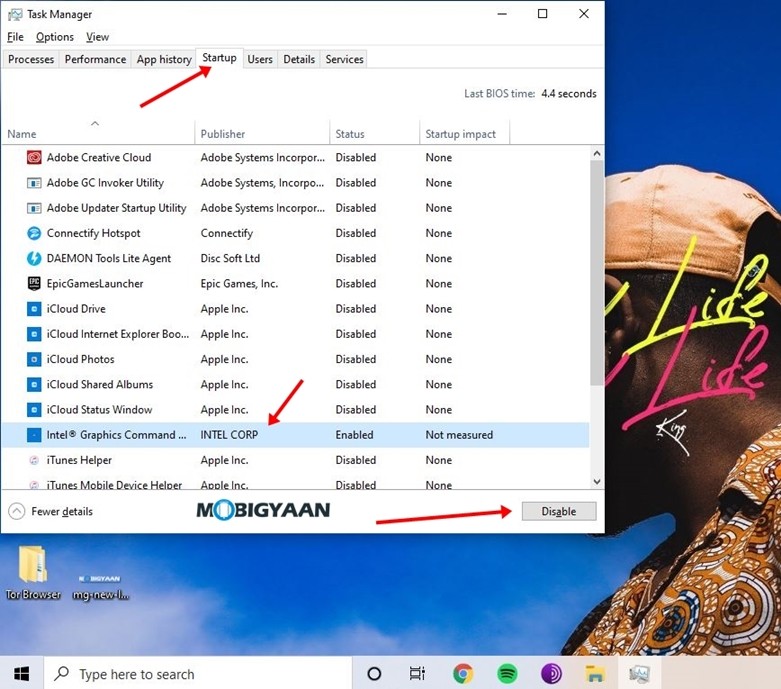
Step 1: Bring up Task Manager by pressing Ctrl + Shift + Esc keys on your Windows 10 system.
Step 2: Navigate to the “Startup” tab to see the list of apps that start automatically when you start your PC.
Step 3: Tap on the app which you want to disable and click on the “Disable” button from the bottom right corner to disable the App.
7) Improve your Gaming Performance
If you are someone who constantly faces frame drops and lags while playing games on your Windows PC then the Game Mode on Windows 10 can help you to improve your Gaming Performance. Turning on Game Mode, allows Windows to make the best use of your hardware and pushes your PC for better performance. To turn on Game mode all you have to do is:
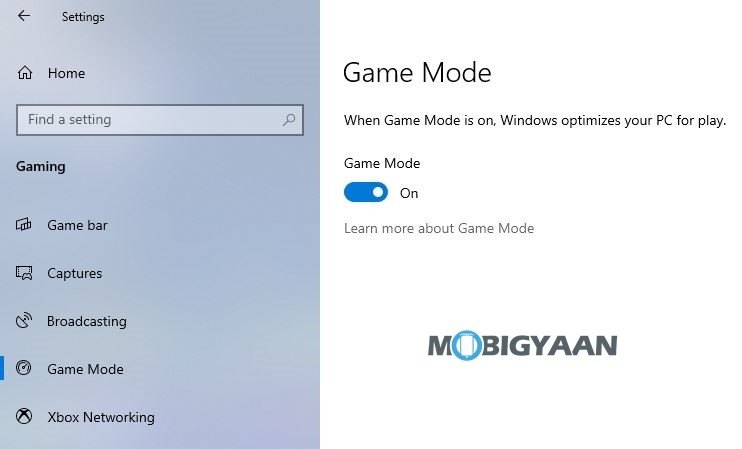
Step 1: Go to Settings -> Gaming -> Game Mode.
Step 2: Toggle the Game Mode button on to turn on Game Mode.
8) Pause Windows Updates
If you are annoyed by the frequent Windows updates on your PC then pausing them can help you to solve your problem. Windows allows you to pause your updates for up to 35 days and to do that all you have to do is:
Step 1: Go to Settings -> Update & Security -> Windows Update.
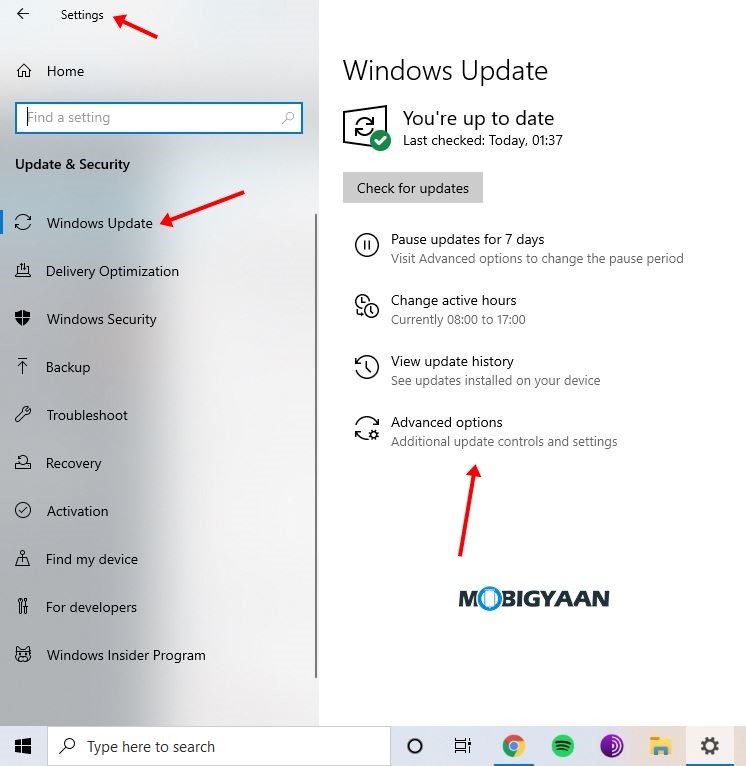
Step 2: Click on Advanced Options and look for the “Pause Updates” section.
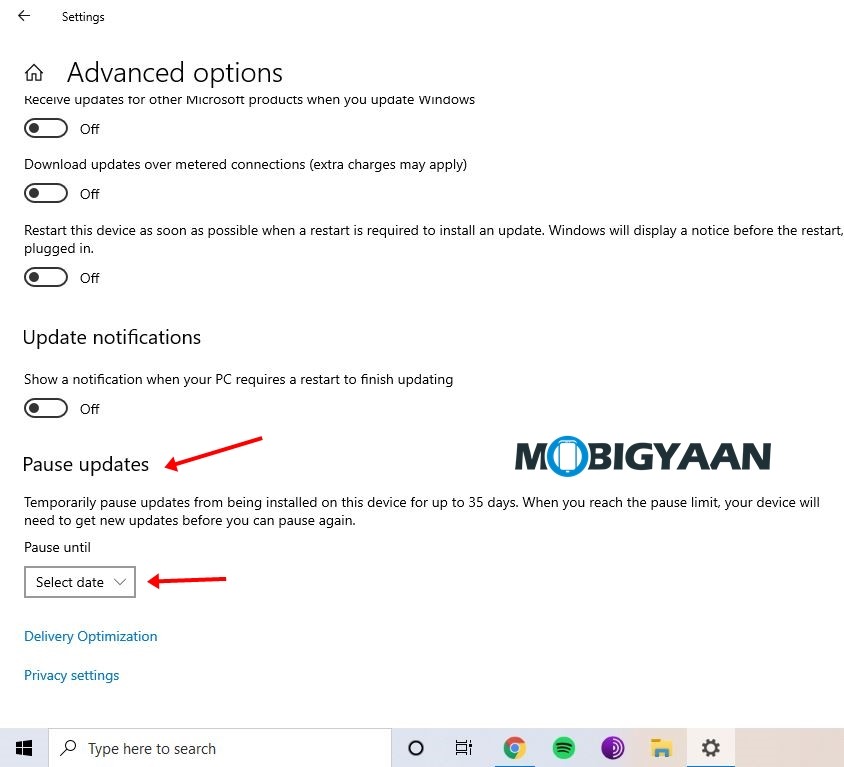
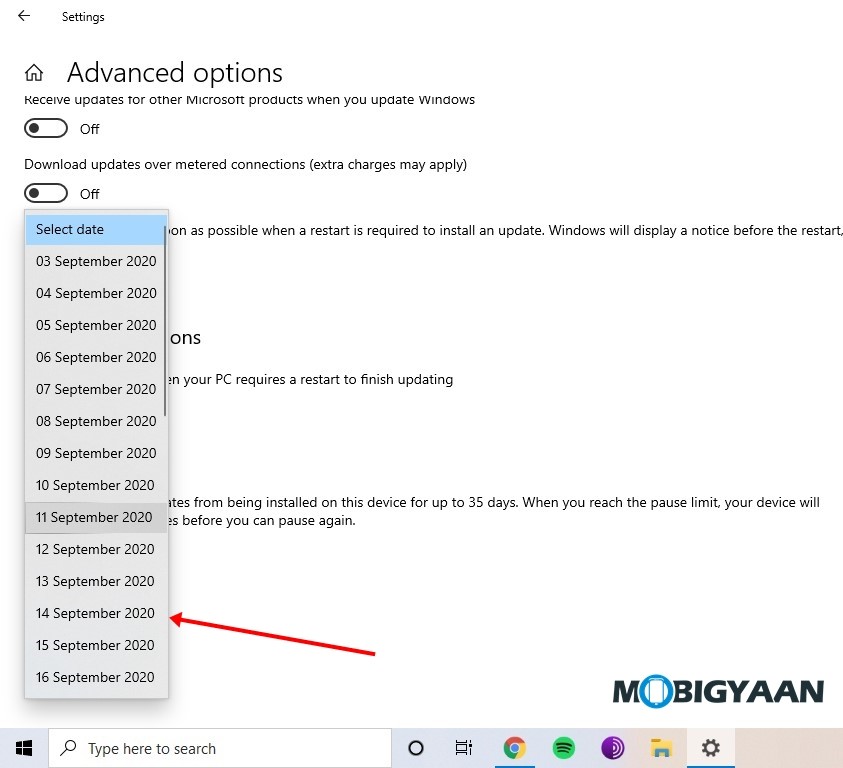
Step 3: Select the date from the Pause Update section and Windows will stop updating automatically until your selected date.
9) Take a Screenshot on Windows 10
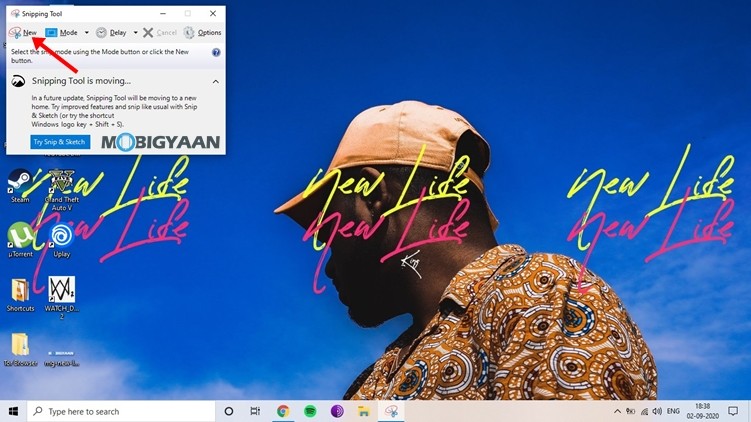
There are more than 5 Ways to take Screenshots on Windows 10 however the Snipping Tool method is the most used method when it comes to taking screenshots on Windows 10. Have a look at the steps below to see how you can take a screenshot using Snipping Tool.
Step 1. Search for Snipping Tool or open it directly from your start menu.
Step 2. Click on “New” to start taking a new screenshot.
Step 3. Drag your mouse on the area you want to capture. Once done save it to your desired location by pressing “Ctrl + S”.
10) Free Up Your Space by deleting Temporary Files
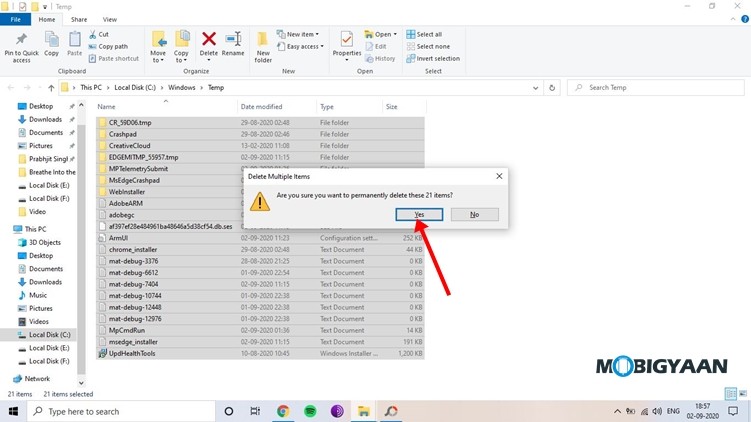
Windows creates a lot of temporary unwanted files that aren’t really needed in your PC. These files just consume space on your Hard drive and hence deleting them becomes important. To delete temporary files on your PC all you have to do is:
Step 1: Bring up Run on your PC and type in “Temp”

Step 2: Once you have the Temp folder on your screen press Ctrl+A to select all files and then press Shift+Delete to permanently delete them from your PC.
That’s all, folks! If you liked this guide make sure you also check out Top 5 Things You Should Do after Installing Windows 10. To get updates on the latest tech news, smartphones, and gadgets, follow us on our social media profiles.
