Microsoft OneDrive cloud storage service comes pre-installed with the Windows 11 operating system, making it easier for the users to store the files on the cloud server and to keep them in sync. This is quite useful if you are keeping a backup of your files and folders on the cloud storage service as it can do this for you automatically.
We recently published a step-by-step guide on how to disable OneDrive from automatically starting on your Windows 11 computer. But what if you don’t just want to stop auto-loading of the cloud storage service but want to sign out from your account on your PC? Well, in this guide, we will show you how to easily unlink your OneDrive account from Windows 11.

When you unlink your OneDrive account from the Windows 11 computer, it will simply sign you out from the PC but keeps the app as it is. This means that you will not lose any files or data that are already synced. You can always access your updated and synced files by signing back into the OneDrive app or OneDrive.com.
How to unlink OneDrive from Windows 11
Step 1: Click on the OneDrive icon on your computer’s taskbar. If the icon isn’t visible, then you may need to click on the “Show hidden icons” or the up-facing arrow icon.
Step 2: In the OneDrive menu that appears, click on the “Help & Settings” option and then select the “Settings” from the list.
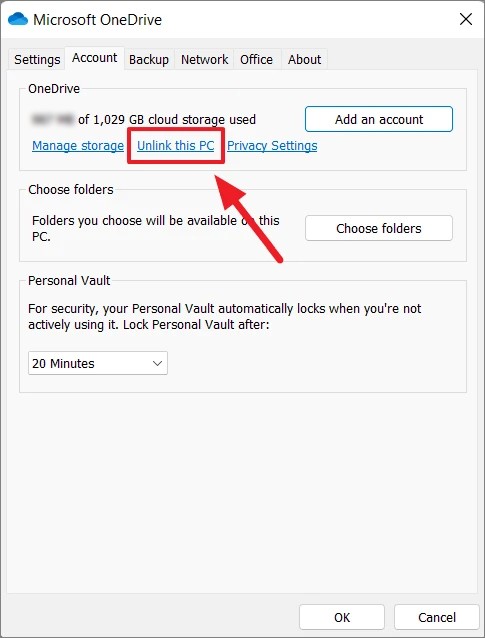
Step 3: Now, a new window for OneDrive will open on your computer. In there, click on the “Account” tab, and under there, you will see a link that says “Unlink this PC.” Click on that link.

Step 4: You will be now asked to confirm the change. In the pop-up confirmation box that appears, click on the “Unlink Account” button.
That’s it. Your computer running the Windows 11 operating system will now stop synchronizing your files to the cloud server. To confirm the change, when you click on the OneDrive icon from the taskbar or when you hover your mouse cursor on the icon, it will show “Not signed in.”
