The Windows 11 operating system from Microsoft comes with a feature called Windows Subsystem for Linux (WSL) that enables users to easily run any Linux distros on your computer alongside the Windows operating system.
When a Linux distro is installed on the system, the lightweight virtual machine will continue to run in the background even when the user exits the command shell, which means that it will keep using the necessary system resources, resulting in performance for the Windows OS.
But thankfully, there’s a way to terminate the Linux distro from the system as soon as the user is done using it. This can be done through the built-in wsl command-line tool and can be used for any particular distribution or for all the distros on the system.
In this step-by-step guide, we will show you how you can quickly and easily terminate all the Linux distributions installed on your Windows 10 or Windows 11 computer with the WSL command-line tool using the built-in Command Prompt or PowerShell on your system. For this guide, we will be using the Command Prompt in Windows 11 operating system.

How to terminate all Linux distros on WSL in Windows 11
Step 1: Open the Start Menu on your Windows-powered computer.
Step 2: In the Start Menu, search for the Command Prompt and select the “Run as administrator” option.
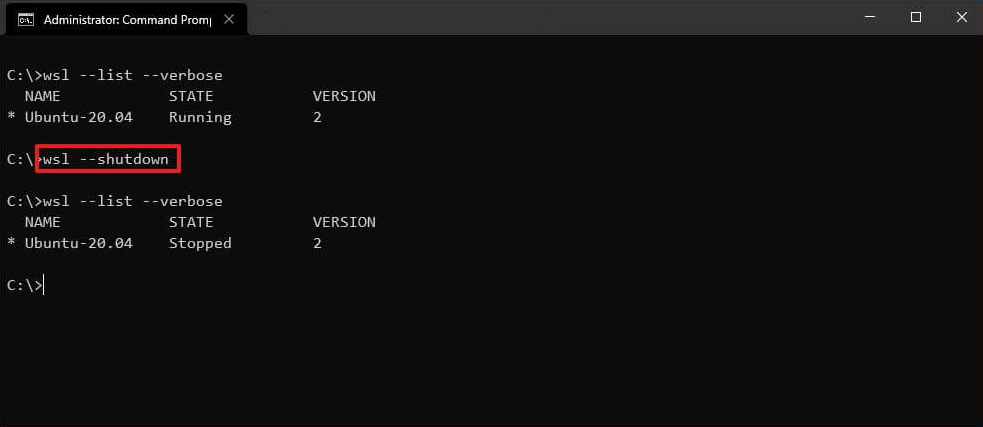
Step 3: When the Command Prompt opens, enter the following command:
wsl --list --verboseThe above-mentioned command will show all the running Linux distros on your system.
Step 4: Type and enter the following command to shut down all the Linux distros on your Windows system.
wsl --shutdown

That’s it. As soon as you enter the command mentioned in the above step-by-step guide, all the running Linus distributions will be terminated from your Windows 11-powered computer. You can enter these commands in the Command Prompt as well as in PowerShell, which will deliver similar output.
