From playing games to watching videos mostly everything we do on a PC requires a stable Internet connection. In 2020, mostly everyone depends on a WiFi network for the internet and when it doesn’t work it gets annoying. There can be several reasons behind this and there are various methods to fix it too. Hence, in this guide, we are going to have a look at how you can fix your WiFi problems in Windows. So, let’s get started.

Method 1: Troubleshoot Problems with Your Internet Connection
Sometimes there are moments when a WiFi network works perfectly on your mobile and other devices but fails to work in Windows and you get a message that says “No Internet Access”. This usually happens due to a faulty TCP/IP stack and troubleshooting easily solves this problem. To troubleshoot your Internet connection on Windows all you have to do is:
For Windows 7:
- Right Click on the WiFi icon in the taskbar > Select Troubleshoot Problems to bring up Windows Network Diagnosis.
For Windows 10:
- Run the Network Troubleshooting Tool from Settings > Update and security > Troubleshoot > internet connections.
Method 2: Update or Reinstall your WiFi drivers.
If you are unable to connect to your internet network even after putting in the right details there are chances that you have problems with your WiFi drivers on Windows. To update or reinstall WiFi drivers on your Windows system all you have to do is:
Step 1: Go to your System Properties and click on Device Manager.
Alternatively, Windows 10 users can also use the search bar or press the Windows + X key to bring up the device manager.
Step 2: Expand the Network Adapters section in Device Manager and right-click on your WiFi driver.
Step 3: Click on the update driver to check for driver updates. If there are no updates, simply uninstall the driver and restart your PC.
Step 4: After restarting your PC, Windows will automatically install the WiFi driver for you.
Have a look at the screenshots below to see how it’s done.


Method 3: Forget Network and Connect Again
Sometimes when you face WiFi issues forgetting the network in your Windows PC and reconnecting with it fixes the problem. To forget a network on Windows all you have to do is:
Step 1: Bring up the Start Menu and head to Settings.
Step 2: Go to Network and Internet > Wi-Fi and click on Manage known networks to bring up a list of the WiFi networks you’ve connected with.
Step 3: Select the WiFi Network you are facing problems with and click on “Forget”. Once done reconnect to check if the problem is solved or not.
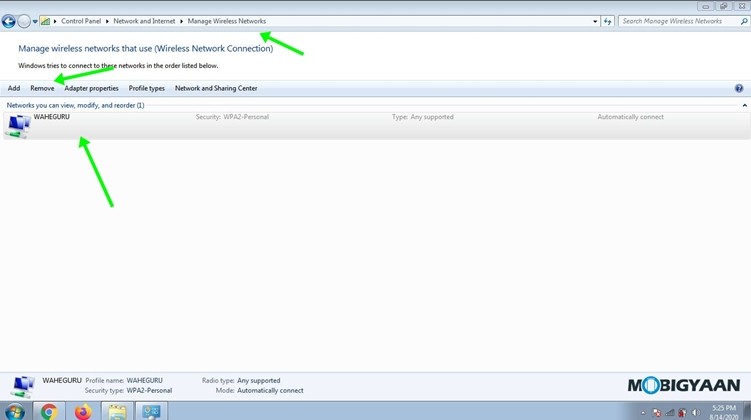
For Windows 7:
Step 1: Go to Control Panel > Network and Internet > Manage Wireless Networks
Step 2: Select the Network you are facing problems with and tap on Remove. Once done, simply reconnect and you are ready to go.

Method 4: Try Disabling your Antivirus or Windows Firewall
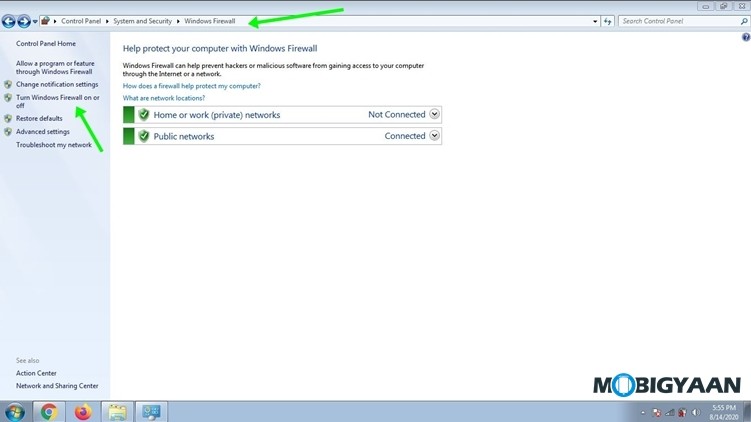
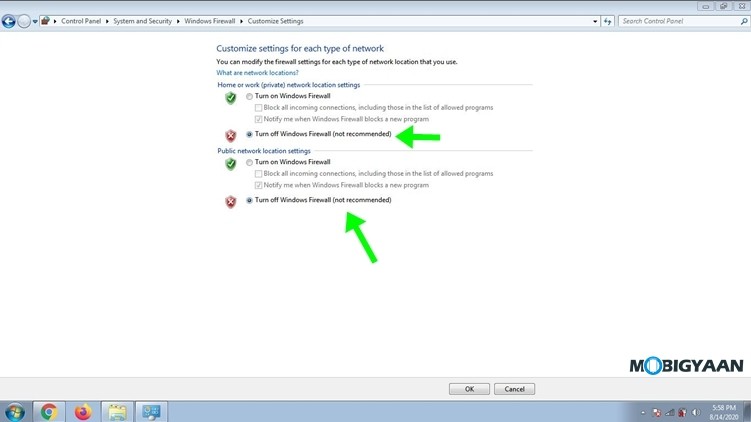
Sometimes your Installed Antivirus or Firewall can mess up with your WiFi connection and hence turning them off becomes important. Since every antivirus comes with different settings for turning off protection we can’t explain that here. However, you can have a look at the steps below to see how to turn off Windows Firewall.
Step 1: Open Control Panel > System and Security > Windows Firewall
Step 2: Click on “Turn Windows Firewall On or Of” from the sidebar to bring up Firewall settings.
Step 3: Turn off Windows Firewall from both Public and Private networks and apply the settings.
That’s all. Have a look at the screenshots below to see how it’s done.


Method 5. Contact your ISP
If none of the above methods worked for you than contacting your ISP would be the right choice. Have a chat with them on call, tell them about the problem, and check if they can help from their side. Most of the ISP’s offer chat assistance too so you can take advantage of that and get your problem fixed on live chat.
That’s all for this guide folks. Do check out more tutorials, guides, tips, and tricks on Windows as well as Mac. For more updates on the latest smartphones and tech, follow us on our social media profiles.

