Google Chrome is currently the world’s most popular and widely used web browser, available across a range of platforms — from Android to iOS to Windows to macOS. While Chrome is the most used browser these days, it is also infamous for taking up too much memory on the device.
The company has now introduced a new fetaure called Memory Saver, which as the name itself indicates, helps by reducing the memory usage from the system. It works by deactivating the inactive tabs and save system resources. To use this feature, the user needs to be running the Chrome version 108 or above.
In this step-by-step guide, we will show you how to quickly and easily enable the new Memory Saver feature for the Google Chrome web browser running on your computer.
How to easily enable Memory Saver feature in Google Chrome
Step 1: Open the Google Chrome web browser on your computer.
Step 2: When the app opens, go to the Settings page by clicking the menu or three-lines icon at the top-right corner and then selecting the “Settings” option.
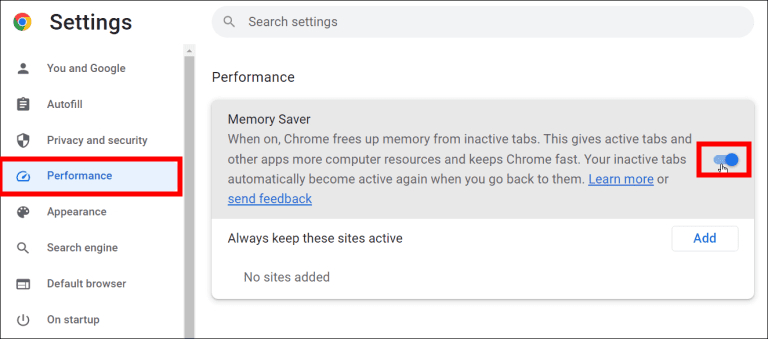
Step 3: On the Settings page, navigate to Performance from the left sidebar.
Step 4: In there, enable the toggle switch for the “Memory Saver” feature.

That’s it. Once you have followed this above-mentioned step-by-step guide on your computer’s Google Chrome, then the Memory Saver feature is enabled on the web browser. When the feature is enabled, Chrome will deactivate inactive tabs after a set activity time, helping free up memory and other system resources.
Memory Saver mode frees up memory from tabs that aren’t currently being using so the active websites the user is browsing have the smoothest possible experience. This comes in handy especially when the user is running other intensive applications, like editing videos or playing games. The company adds that any inactive tabs will be reloaded when the user needs them.

