If you are using Chromebook or Chromebox, then almost everything that you work on is through the Chrome browser. If you have enabled notifications for many websites or using some services that keep pushing notifications, then it becomes a bit annoying when you are working on something important.
In such a situation, you can enable the Do Not Disturb mode on your Chromebook. As the name indicates, enabling this mode will silence all the new notifications on your device. Here is a step-by-step guide on how you can do so.

Enable Do Not Disturb mode in Chromebook
Step 1: On your Chromebook, open the Status Area in the bottom-right corner of the screen that shows the Wi-Fi Signal and Battery Level.
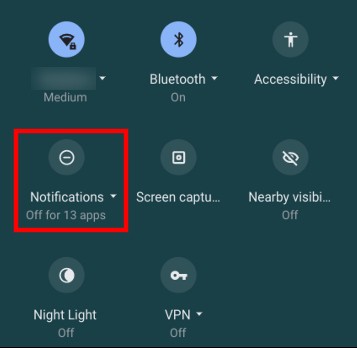
Step 2: Now, toggle the button labeled “Notifications” in the menu.
Step 3: You will now see that the Chromebook has added a new dash-like icon in the status area to indicate that the “Do Not Disturb” mode is active.

When the Do Not Disturb mode is enabled, your Chromebook will silence all incoming notifications. It will also no longer display a prompt in the bottom-right of the screen for new alerts. You can browse pending notifications in the list above the “Quick Settings.”
If you want to disable notifications for select websites or apps on the device, then you can click the downward-facing arrow beside the label of Notifications and uncheck the websites or apps that you want to disable the notifications from.
