Google Chrome has been the most popular browser for several years now, and it offers tons of features that make it easier for users to browse the internet. However, the browser lacks a few features, but the company has now introduced support for one of them — built-in screenshot tool.
The Chrome web browser now comes with a built-in screenshot tool that enables users to take a screenshot of any webpage without the need to install any third-party extensions. It appears as a part of the “Share” menu in the address bar and also supports a few tools for annotating screenshots.
In this step-by-step guide, we will show you how to easily enable the built-in screenshot tool in the Google Chrome web browser on your Windows computer.
How to enable built-in screenshot tool in Google Chrome
Step 1: Open the Google Chrome web browser on your computer.
Step 2: When the browser opens, go to the flags settings page by entering the following in the address bar:
chrome://flags
Step 3: In there, use the search bar to find the “Desktop screenshots” option.
Alternatively, you can enter the following in the address bar to directly open the relevant settings:
chrome://flags/#sharing-desktop-screenshots

Step 4: Use the drop-down menu right next to the “Desktop Screenshots” and “Desktop Screenshots Edit Mode” and then select the “Enabled” option.
Step 5: After you make the changes, the browser will ask to relaunch. Click the “Relaunch” button from the bottom of the screen.
That’s it. Once you have followed this step-by-step guide and enabled the above-mentioned flags, the built-in screenshot tool will be enabled on your Chrome browser running on the Microsoft Windows operating system.

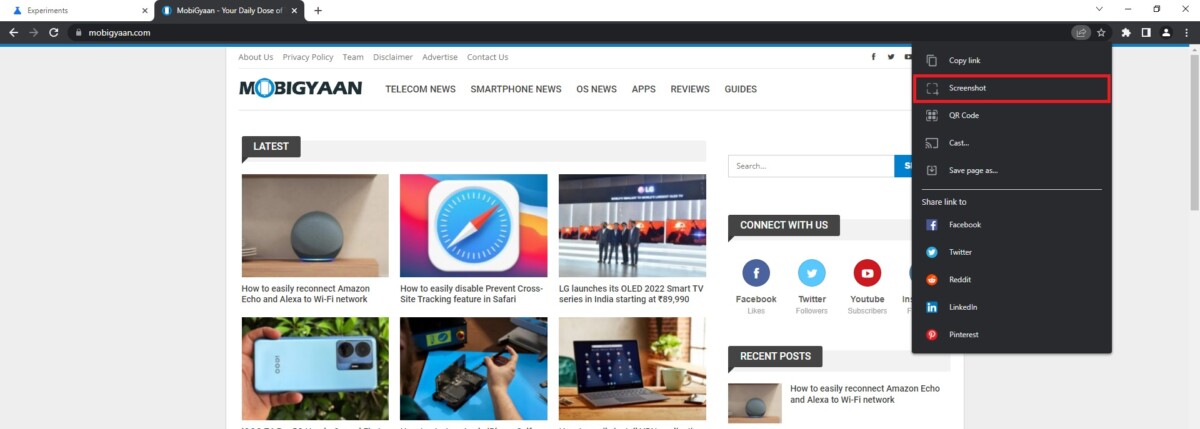
To use this tool, click on the “Share this page” button right next to the webpage’s URL and select the “Screenshot” option from the drop-down menu. Select the area of the screen, and the screenshot will be automatically copied to the clipboard, and a preview will also be shown at the top of the right corner in the Chrome browser.
There will be two options once the screenshot is captured — Edit and Download. If you click the Download button, then the screenshot will be saved as a PNG image on your computer, while clicking the Edit button will open a new “Screen Image Editor” tab with tools to edit the screenshot.

