With the introduction of macOS 10.12 Sierra, Apple added a function to the operating system that enables users to automatically clear the contents in the Trash every 30 days. This is a good step to ensure you have free disk space.
The feature is disabled by default but there is an easy way to enable it. If you don’t know how to do it, here is a step-by-step guide to enable the automatic trash clear function on your macOS device.
Enable automatic trash clear on macOS
Step 1: Open the “Finder” app on your Mac. For this, click the “Finder” icon from the dock at the bottom.
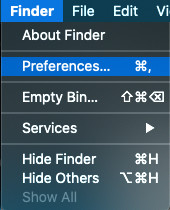
Step 2: Now, in the top menu bar, click on “Finder” and from the drop-down option, click on “Preferences.”

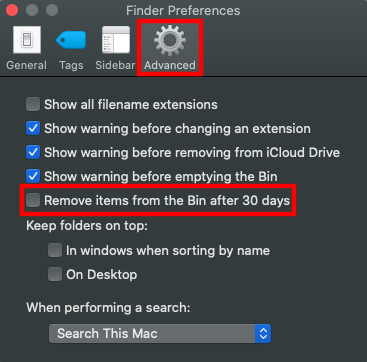
Step 3: In the “Finder Preferences” screen, click on the “Advanced” button.
Step 4: Locate the option that reads “Remove items from the Trash after 30 days” and tick the checkbox.

Step 5: Now your macOS system will automatically delete all the files from the Trash every 30 days.
If you no longer want to use this feature then you can disable it the same way. Just open up the Finder Preferences and then uncheck the checkbox that you ticked in the above-mentioned Step 4.
You can also check out our other Windows guide to make your experience even better by customizing the operating system as per your needs. We have also covered quite a few other guides related to macOS, Windows, and Chromebook as well.

