In macOS, Apple offers a tool named “Optimize Storage” which helps the user in removing unwanted files from the computer. Most times, the files removed by this program may not be directly accessible to users.
For instance, whenever a user streams media content such as music, a movie, or a TV show, a version of the content is stored on the computer. By using the optimize storage feature, those unwanted files get removed automatically.
While the user can also remove “other” storage from the macOS system manually, we will be focusing on the automatic method for this guide. Here is a step-by-step guide on how to optimize the other storage on your Mac device.
How to auto-optimize storage on Mac
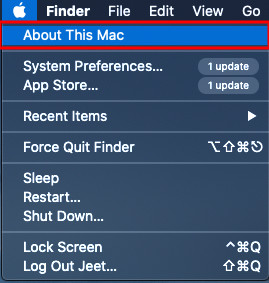
Step 1: In the top-left corner of your Mac device, click on the Apple icon, and from the drop-down menu, select the “About this Mac” option.

Step 2: Now, in the new window that appears on the screen, select the “Storage” tab.
Step 3: In the Storage section, click on the “Manage” button which is placed beside the name of your hard drive.

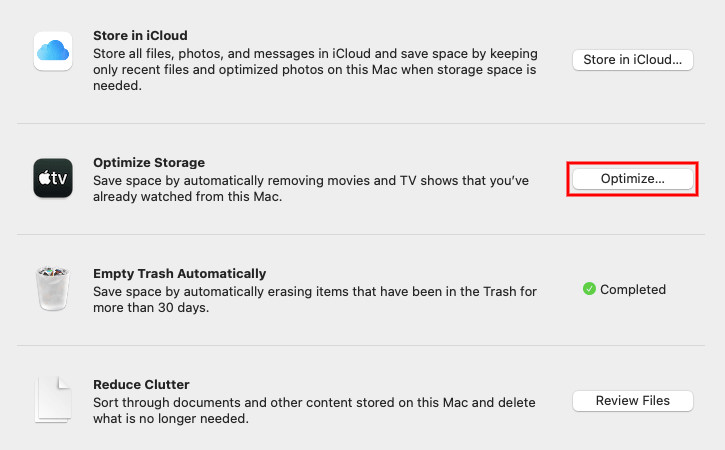
Step 4: In the next window that appears, under the “Optimize Storage” section, click on the “Optimize” button.

Step 5: You will now be asked to reconfirm this action. To continue optimizing the storage, click on the “Optimize” button.

Once the process is completed, you will see the “Completed” message instead of the Optimize button under the “Optimize Storage” section. This indicates that the system has cleared a part of Other storage on your computer.

