macOS has a Library folder which Apple hides by default. The folder comes in handy if you want to clear cache, remove the app’s leftovers, edit preference files manually, among a few other functions.
But, given that the Library folder is hidden by default in macOS, it becomes difficult for the regular user to access it. In this guide, we will show you how you can easily access the macOS Library folder. There are multiple ways to do so and we are listing three methods that we know.
Why is the Library folder hidden?
Do note that there’s a reason Apple keeps the Library folder hidden on the macOS. The reason is that it holds all the important data related to the operating system as well as installed applications.
So, in case you accidentally delete files or modify them, it could cause some serious issues with your system. In short, if you are not sure what you are doing accessing the Library folder, don’t do it.
In case you want to move forward and modify data in the folder, it is a good idea to create a backup of your system before going ahead.
Method 1
One of the easiest ways to access the Library folder on your macOS is through the “Go” menu. Here is the step-by-step guide.
- Open the Finder app
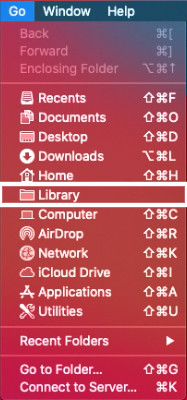
- From the menu options, click on “Go” while pressing the Options key on your keyboard.
- Now, from the drop-down list, select “Library” and you’ll be taken to the location.

Method 2
Another way to access the Library folder is through a command. Here’s the step-by-step guide for doing so.
- Open Finder app on your system
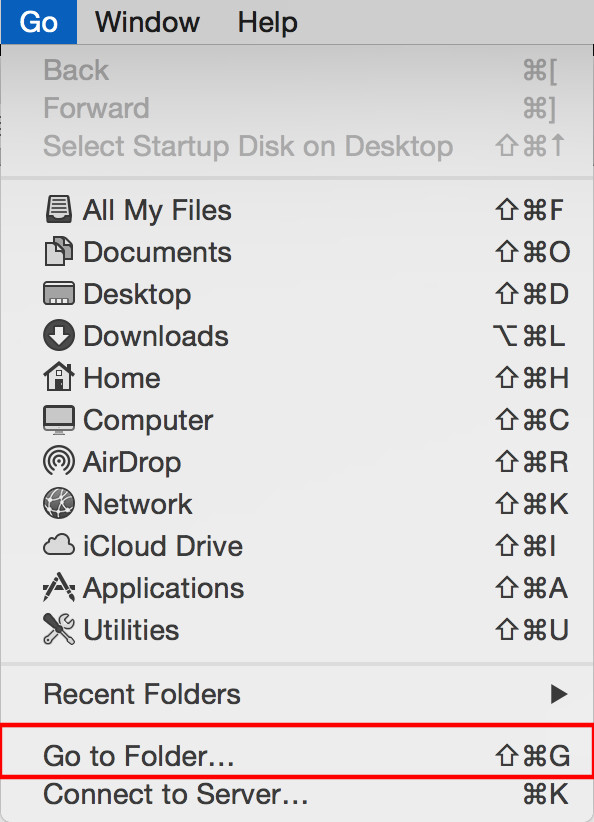
- Click on the “Go” option from the menu bar

- Select and click on the “Go to Folder” option
- In the input field, type in “~/Library” and click on “Go”

Method 3
In this method, we will make the Library folder visible so you can easily access it just the way you access a regular folder.
- Open the Finder app
- Go to the user account’s home folder.
- Now press the “Command + Shift + . (dot) keys on the keyboard
- You will now see the Library folder along with a few other hidden folders as translucent icons
- Just click on the Library folder and that’s it.
You can again press the “Command + Shift + . (dot) keys on the keyboard to make the system folders hidden.
Method 4
Unlike the above three methods, this one makes the Library folder visible to everyone permanently.
- Open a Finder window.
- Select Go > Home from the menu
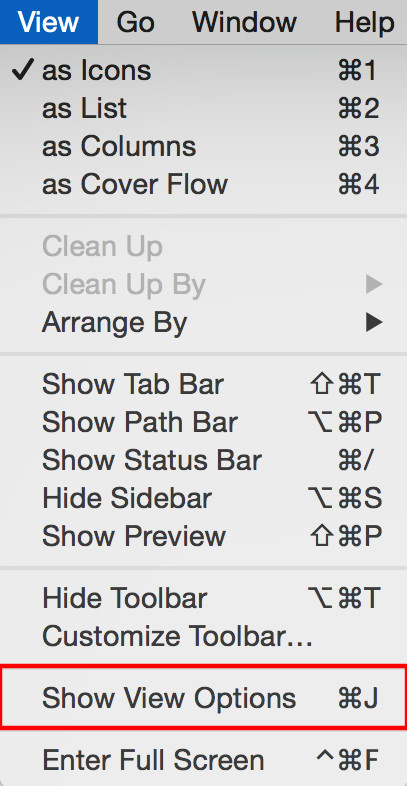
- Now go to View > Show View Options in the menu bar
- In the window that appears, tick the checkbox next to Show Library Folder

We have published a lot of other guides related to Windows 10, macOS, Android, iOS, Chromebooks, and more. So, make sure to check out our Guides section for more of such helpful guides and tips.
