Microsoft’s Windows operating system comes with tons of features and most of them can be accessed or customized from the Settings or Control Panel or a dedicated tool in the Windows OS. However, there are some advanced features that needs to be accessed or customized through the BIOS Settings Menu.
The features that needs BIOS access are usually the advanced ones, such as enabling secure boot or changing boot order or options on your computer, among others.
There are several different ways to access the BIOS Settings menu on your computer running the Windows 11 operating system and in this guide, we will show you a couple of easier ones.
In this step-by-step guide, we will show you how you can quickly and easily go to or access BIOS Settings menu on your computer by the dedicated key or through the Windows Recovery Environment from the Settings application.
Method 1: Pressing BIOS Key At Startup
This method is quite easy and one of the widely as you can access BIOS Settings through this method when the Windows operating system is booting up. So, you don’t have to wait for the Windows to load and then go through the process of entering the BIOS Settings.
When you power on the computer, just press the designated key for entering the BIOS settings menu. There’s a small window to do this process, so it’s a good idea to keep pressing the key when the computer gets powered on. If you see the Windows logo, then it means that you missed it and you will need to restart the computer and follow the process again.
There’s one dedicated key that you need to press to go into the BIOS Settings Menu but that key differs based on the manufacturer. Here’s a list of all the popular manufacturers and the dedicated key for the BIOS settings menu.
- HP:
F10 - Dell:
F2orF12 - Gigabyte, MSI, and Zotac:
Del - Asus:
Del,F10orF9 - Acer:
DelorF2 - Lenovo:
F2,Fn + F2,F1, orEnterfollowed byF1 - Microsoft Surface Pro: Press and hold Volume Up
Method 2: WinRE from Settings
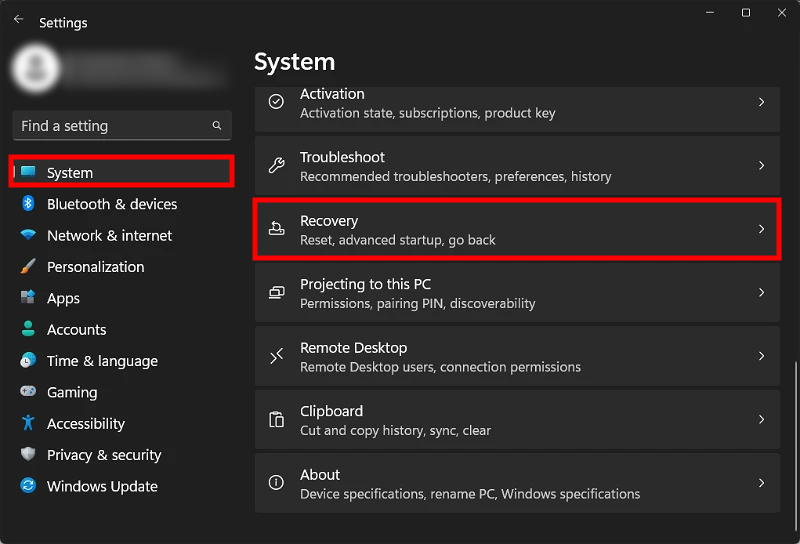
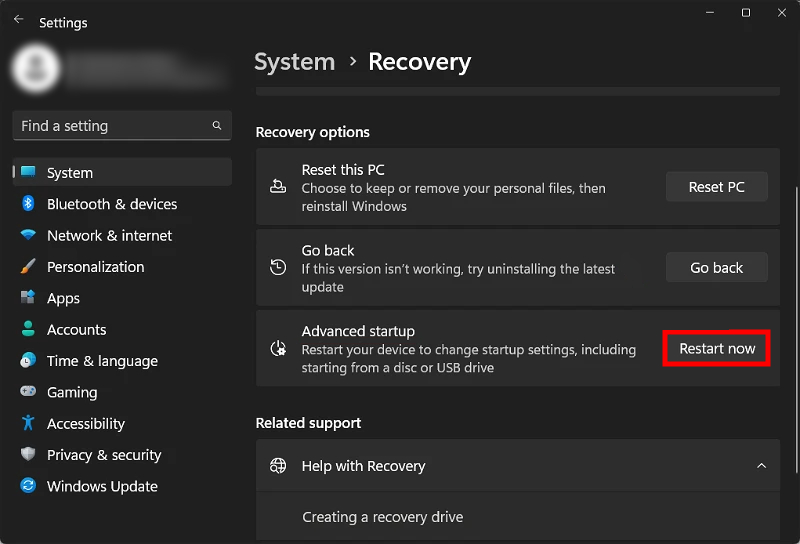
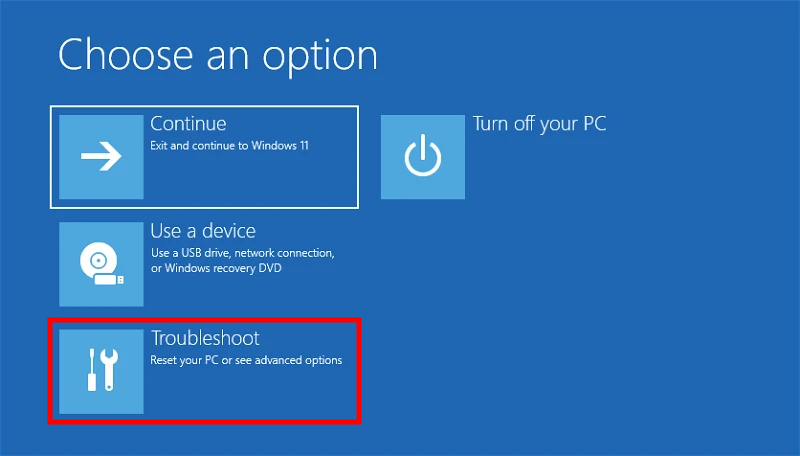
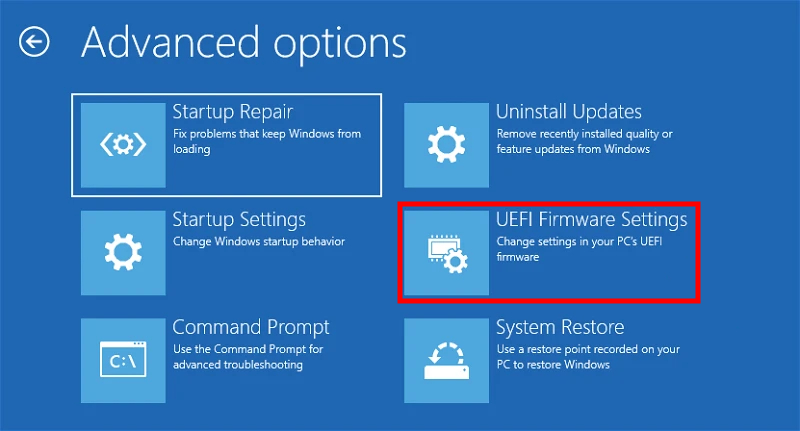
If you computer is already on and you are using the Windows operating system and don’t want to go through the hassle of pressing the dedicated key when the PC boots up, then this method is the one you should try. All you need is to go to the Settings app and click on a button. Here’s a step-by-step guide to enter the BIOS settings menu through Windows Recovery Environment (WinRE) from the Settings app.
Step 1: Open the Settings application on your Windows 11 operating system.
Step 2: Click on the “System” option from the left-side pane.

Step 3: On the right side, click on the “Recovery” option.
Step 4: In there, next to the “Advanced Options,” click on the “Restart” button.

Step 5: When the Windows Recovery Environment loads after the computer restarts, click on “Troubleshoot” and then “Advanced Options” on the next screen.


Step 6: On the following screen, click on the “UEFI Firmware Settings” option and then the “Restart” button.

That’s it. After you have followed the above-mentioned step-by-step guide, the computer will restart and open the BIOS Settings Menu. You will now be able to customize advanced settings or update the BIOS on your device.

