Chromebooks, running the Chrome OS is a budget-friendly device that enables users to do some light tasks as well as internet-based tasks. The devices are pretty popular because of its low cost, especially in the educational institutes for students.
As the device is running Google’s Chrome OS, which is basically a Chrome browser with some additional features, there’s a learning curve involved, especially if you are switching from a Windows or macOS powered device.
For instance, there’s no Recycle Bin or a Trash bin on Chromebook and instead, when you delete a file from the device, it gets permanently deleted. Thankfully, there’s a way to enable the Recycle Bin feature on the device.
In this step-by-step guide, we will show you how to quickly and easily enable the Recycle Bin feature on your Chromebook using experimental flags.

How to easily enable Recycle Bin feature in Chromebook
Step 1: Open the Google Chrome web browser on your Chromebook.
Step 2: When the browser opens, enter the following in the address bar:
chrome://flags
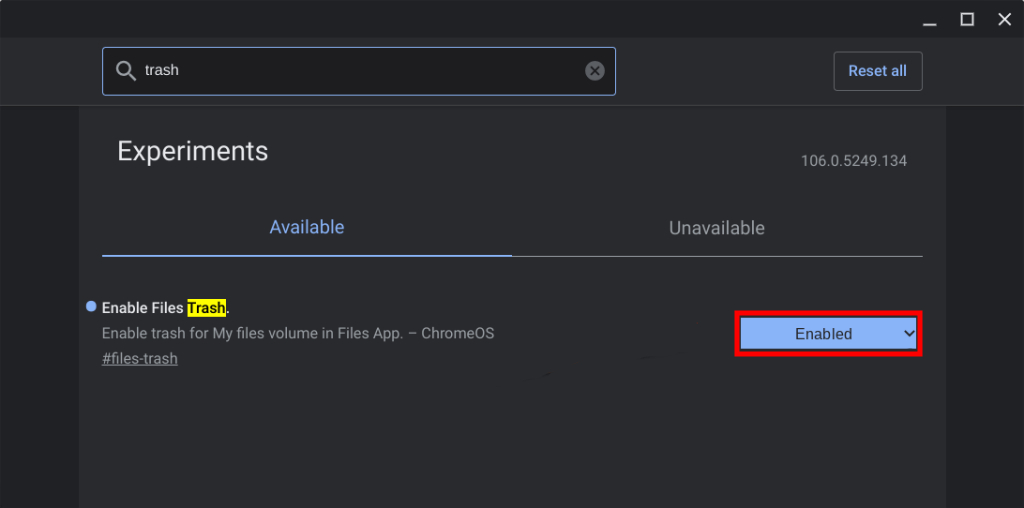
Step 3: On the Experiments page that loads, search for “Enable Files Trash” and hit enter.
Step 4: Click on the drop-down menu next to “Enable Files Trash” and select the “Enabled” option.
Step 5: After making the changes, click on the Restart button at the bottom of the screen.

That’s it. Once you have followed the above-mentioned guide, then the Recycle Bin feature has been enabled on your Chrome OS-powered Chromebook. After the device boots, open the File application and you will see a new Trash option at the bottom of the list on the left sidebar.
Do note that deleting the files from the Chromebook won’t put them in the Trash bin but will permanently delete the file from the device. Instead, right-click on the file and select the “Move to Trash” option or press the ALT + Backspace keys on the keyboard to move the files to the Trash folder instead of permanently deleting the files.
