Apple recently rolled out the iOS 14 to the public and its one of the biggest iOS updates till date. iOS 14 brings in new home screen widgets, redesigned Call UI, App Library, and a lot of more features. While these features are known by mostly everyone who is using iOS 14 there is one hidden feature known as ‘back tap’ which allows users to perform various tasks by tapping on the back panel of their iPhone.
It comes with a lot of prebuilt actions that you can set to perform different tasks on your iPhone. Some of my personal favorite actions include taking a screenshot, adjusting the system volume, opening up the Control Centre, and Scrolling up and down on the screen. Everything mentioned above can be done with a double/ triple-tap on your back panel.
In addition to this, the Back Tap feature works perfectly even when you are using your iPhone with a Hard / Soft case which is really cool. In this guide, we are going to see how you can use the ‘Back Tap’ feature on iOS 14. Without waiting further, let’s get started.

How to use the super cool Back Tap feature on iOS 14:
Before we get started with the process make sure you’ve updated your iPhone to iOS 14. If you haven’t done it yet simply go to Settings -> General -> Software Update and you’ll see the iOS 14 update on your iPhone. Every iPhone that got the iOS 13 update is eligible to get the latest iOS 14.
As this is a major update, the update size can be between 2.5 GB to 4 GB depending on your iPhone model and the iOS version you are using. Now, let’s get started with the process and see how it’s done.
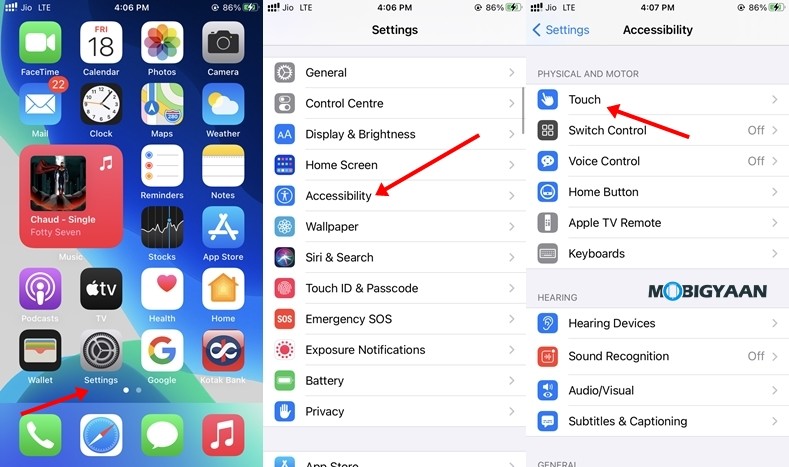
Step 1: Bring up Settings on your iPhone and go to Accessibility -> Touch.
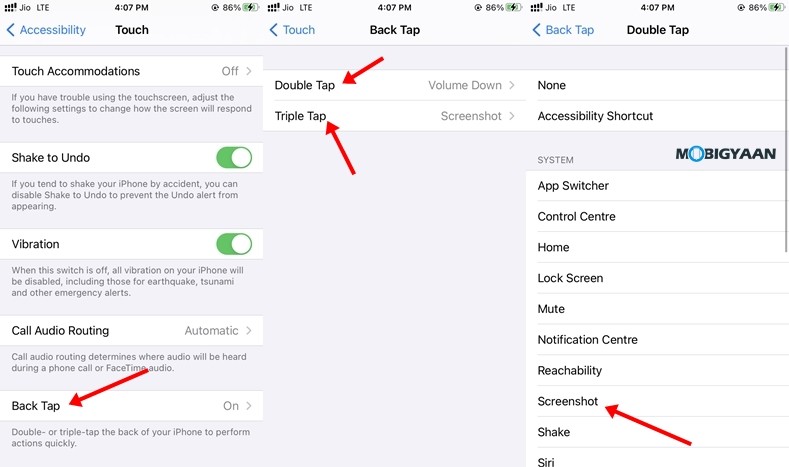
 Step 2: Scroll down and find the ‘Back tap’ option in the Touch section of your Accessibility settings.
Step 3: Tap on “Double Tap” and define your action. We’ve selected volume down but you can choose any action you want.
Step 4: Tap on “Triple Tap” and select the task you want to perform when you triple-tap on your back panel. If you are a person who takes a lot of Screenshots and you are using a bigger iPhone then the Screenshot option would be the best choice for you.
Step 5: Once you’ve assigned the actions simply go back and your settings will be applied.
Have a look at the image below to see how it’s done.

That’s all, folks! If you liked this guide make sure you also check out How to use the Stock App on iPhone and iPad. Don’t forget to share this guide using the social media buttons and to get updates on the latest tech news, smartphones, and gadgets, follow us on our social media profiles.

